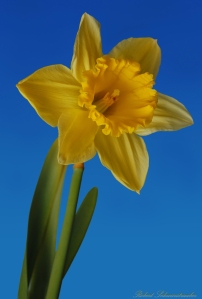
How does one create a prize winning Spring photograph on a budget when the infamous Buffalo Winter has yet to release a single bit of green from beneath the snow?
Because there was no hope for seeing real daffodils in Buffalo this early (March) I went to the florist and bought one for 2 bucks and some change. I felt a touch of envy for those living in warm sunny climates.
I had hoped for a clear blue sky outdoors, to shoot the lovely flower in it’s natural element, but it rained and rained, a cold March rain, until I could wait no more.
Finally, I had to accept that an indoor shoot was the best I could hope for.
Luckily, I have a room painted with blue walls that would make a good background “sky”. But if I didn’t, I would have found a light blue bed sheet perhaps, or even painted a flat blue latex onto some smooth cardboard, or glass. It’s easy to remove the latex from glass, so that makes it re-useable.
I put a spring clamp at the base of the flower to hold it, set it on a chair in front of the blue walls. I knew I needed a big light source, close, to create softness so I hung a big white bed sheet from the ceiling behind me to bounce my speedlight (optional on-camera flash) off of. I use the Nikon SB-600. It has a rotating, tilting flash head that lets me direct the flash anywhere I like, not just straight on like the built in flash.
Built-in, pop-up flashes are next to useless for any quality photo work, because they are a small light source (harsh) that hits your subject straight on leaving hot spots (areas that are too bright) and takes away any feel of three dimension.
If you like a soft, even light that surrounds your subject to give it that 3-D look you should never aim your small flash (or most big one’s for that matter) directly at your subject. Aim your flash to let it bounce it off big white walls or ceilings, white boards, sheets, window curtains. Do be careful not to bounce it off colored surfaces though as they can tint your photo.
It’s almost always a good idea to get your flash off the camera if you can. Optional cords or wireless triggers are available for most DSLR cameras and speedlights. Having the flash off camera lets the light shine at the best possible angle for showing your subject and lets your photo have a more realist 3D look. If you can get your flash off camera, you can also place a white umbrella or fabric between the flash and your subject. This is called “shoot through” for obvious reasons.
OK, back to our project of creating the outdoors, indoors.
This was a one flash, on camera, deal.
I got down on the floor to shoot up at the flower to make it unusual. (most folks shoot down on the flower because that’s where they are). Most times when we use a flash we flash up, because that’s where it is too – on top of our camera. But to do that meant the top of the photo would be lighter than the bottom, not what we see when we look at the sky. When we look at the sky, the top is darker.
So I turned my camera sideways and angled the flash 45 degrees to the floor and the rear white sheet to lighten the lower part of the photo. The big sheet gave lots of softness to bring out the petal details with gentle shadows, and the lighter bottom gave a real-to-outdoors look. A touch of gradient boost in Photoshop added additional darkness to the “sky”.
Think about the light when you shoot. Think about what I call the “3C’s + 1″
Composition, Color, Clarity + that certain something different.
A new perspective or digital prop could be that something different. Don’t let circumstances dictate your results. “Find a way,” I always say. Here, I chose an interesting perspective most people never see of a flower.
“When you can master the light your photography will delight.”
Have fun. Try something different. Look at lots of photos on the internet. Amongst the thousands of images you’ll find 10 or so that really stand out. Study those. Try to imagine what they might have done to create those images. Look at the composition. Look at the colors. Look at the Clarity especially, because without focus…you haven’t got a shot!
Ansel Adams, America’s most famous photographer once remarked that, “Great photographs aren’t taken, they’re created.” And, of all the photos he took in a month, if he had one that was great, he was very pleased indeed.
Click on the photo above to view larger. This won first place in a March 2010 International photo contest.
With a little practice and study, you will be creating prize winning photos yourself in no time!
Tip for the Day: A large light source, close to your subject creates soft, 3 dimensional light.
Extra Tip for the Day: The sun is the ultimate large light source. But too bright at midday. Shoot early mornings or evenings for the best light. Never in bright unfiltered, sunlight. Clouds make the ultimate “shoot through” for the sun. Clouds filter and soften the sun’s rays, making them our friends when shooting outdoors. Use them to your advantage.
Get a ton more simple tricks and special effects you can use right now below by clicking on the great resource link below…You won’t believe what you’ve been missing!


