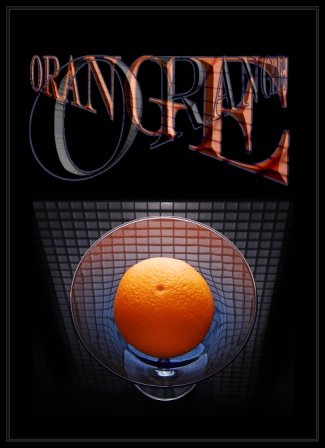
Many folks were curious how this shot was made.
Actually, it’s a fairly simple setup that, surprisingly, doesn’t require much Photoshop.
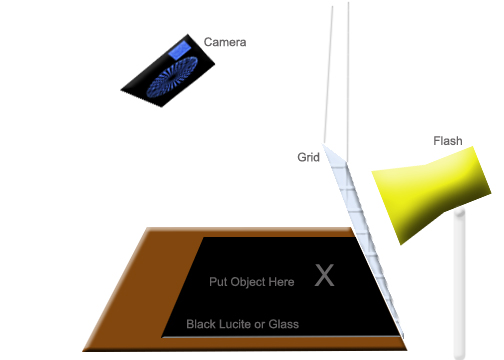
The light grid you see is a actually a reflection of the original light source, because the glass is set on a reflective Lucite base (you could use black glass or plain glass over something black)
Here’s a diagram of the setup:
Since we’re using a black base, it’s easy to use Photoshop later to simply cut off, mask or paint over any unwanted reflection areas.
Add your text and you’re done!
The text color was taken from the orange, and a grid texture was overlayed to match the photo, then a sharp bevel added. Once rasterized, it could be Free Transformed into this angle. The text layer was duplicated for the “clear” text which was actually black text but the blend mode for that layer was changed to I think Overlay.
That’s it!
Of course you could substitute any object, but I think the a glass object works well because it gives that “see-thru” effect.
Quick Composition Notes:
- 3 objects…Orange/Glass, Reflection, Text
- 3 Colors…Bluish, Orange, Black
- High Background to Subject Contrast
- Bright Color (Orange)
- Diagonal Lines in Grid and Text Give Depth
Finally, the light grid is a simple D.I.Y. project. The actual grid is from the home store. A simple 2×4 ceiling grid normally used for a fluorescent fixture. It is covered in a nylon fabric shower curtain cut to size from Walmart.It’s lightweight, durable and portable. Attach the fabric to the frame with some white thread or Velcro.
Total Investment: Less than $15 and you’ll have plenty of nylon fabric left to make other interesting light modifiers!
Need more cool ideas? Check out this great new resource for creative photography…


