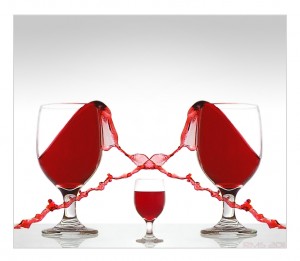
This photo uses the same basic lighting and camera position as the Reverse Water Reflection.
Keeping with my favorite design “secret” of using three elements, we have one pouring glass that was flipped and duplicated in Photoshop to produce 2… and also, in the center is the original photo of the untipped glass that I used to set the exposure.
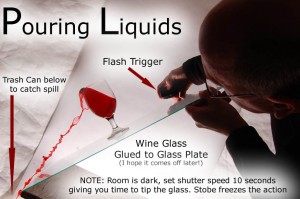
Here’s a diagram of the set up…
Note: This is done in a darkened room. Doesn’t have to be pitch-black, you still need to be able to see what you’re doing.
I should have raised the strobe position higher because the light became too dim as I raised the glass. I also should have slid the whole rig to camera right so that glass was central when spill occurred.
But, after cleaning up 4 previous messes, I was just happy to finally get this useable shot!!!
Be advised, our natural tendency is to tip the glass slowly. Don’t do it! The water will cling to the side of the glass and just make a mess. Forget how your parents yelled at you for spilling. Spill with gusto for the best shots!
So you’re in a darken room, you set the shutter speed at 10 seconds and trip the shutter. Then, step over to your rig and tip it with gusto. (Be advised, you must raise the glass higher than you’d ever expect). When you first hear the liquid hit your catch bucket (you did put a catch bucket in place didn’t you?) trip the strobe flash remote to record the shot.
The camera sees nothing (because the room is dark) until you trip the shutter. It will freeze the action in light for that split second, so don’t worry your moving the rig will cause blur. It won’t.
The closer you can tilt your camera on the tripod to the final tip angle, the less editing you’ll have to do later in Photoshop. Around 80 degrees might be a good start.I didn’t tilt mine enough initially, as seen in the set-up photo.
Also, be sure to protect your under table strobe from any possible liquids (yes, splash can go everywhere despite your careful bucket placement.)
I’ve heard that rubber cement works well to adhere the glass because it holds well but is easily removed later. I was in a rush so I used contact cement. It holds fabulously, but I’m not certain it will ever come off again. I’ll come back and let you know at a later time. ***Good news! Soaked the bottom of the glass with acetone (nail polish remover) worked it under a bit with a razor blade and after about 5 minutes they came right apart! The glue cleaned off completely. Still, I’d recommend getting an inexpensive glass (mine was $1.49 at the Shopper Choice discount store.) Don’t try it with your wife’s (or your mom’s) best crystal! In any case, don’t let them know what you’re doing at all…they just don’t get us!***
Now there’s another great rainy day, creative photography thing to do.
Have fun. Take your time and expect a few messes before you get it right.
Have some paper towels on hand for clean up.
Note: The “WINE” is really just water, (make three full glasses before you begin to account for practice spills) with about two tablespoons of glycerine (found OTC in any drugstore, which helps make the water flow better or cling to itself) and food coloring (lots of red, with just a small drop of blue). I would never waste a good glass of wine!
“Trick Photography and Special Effects” also has tons of cool ideas for the creative mind…have a look!
Click below to see why smart photographers are loving this new tell-all book…


